Zero-Downtime Postgres Major Upgrades with Logical Replication
Zero-Downtime Postgres Major Upgrades with Logical Replication
We walked through this pattern on video — the live cutover, the lag monitoring, the moment you flip the connection string and hope the sequence sync didn’t miss a beat. This post is the deeper, copy-paste-ready version. It’s not a pitch. It’s the notes I’ve kept from actually running these upgrades under a strict SLA, where “restore from backup” isn’t a rollback plan — it’s a career conversation.
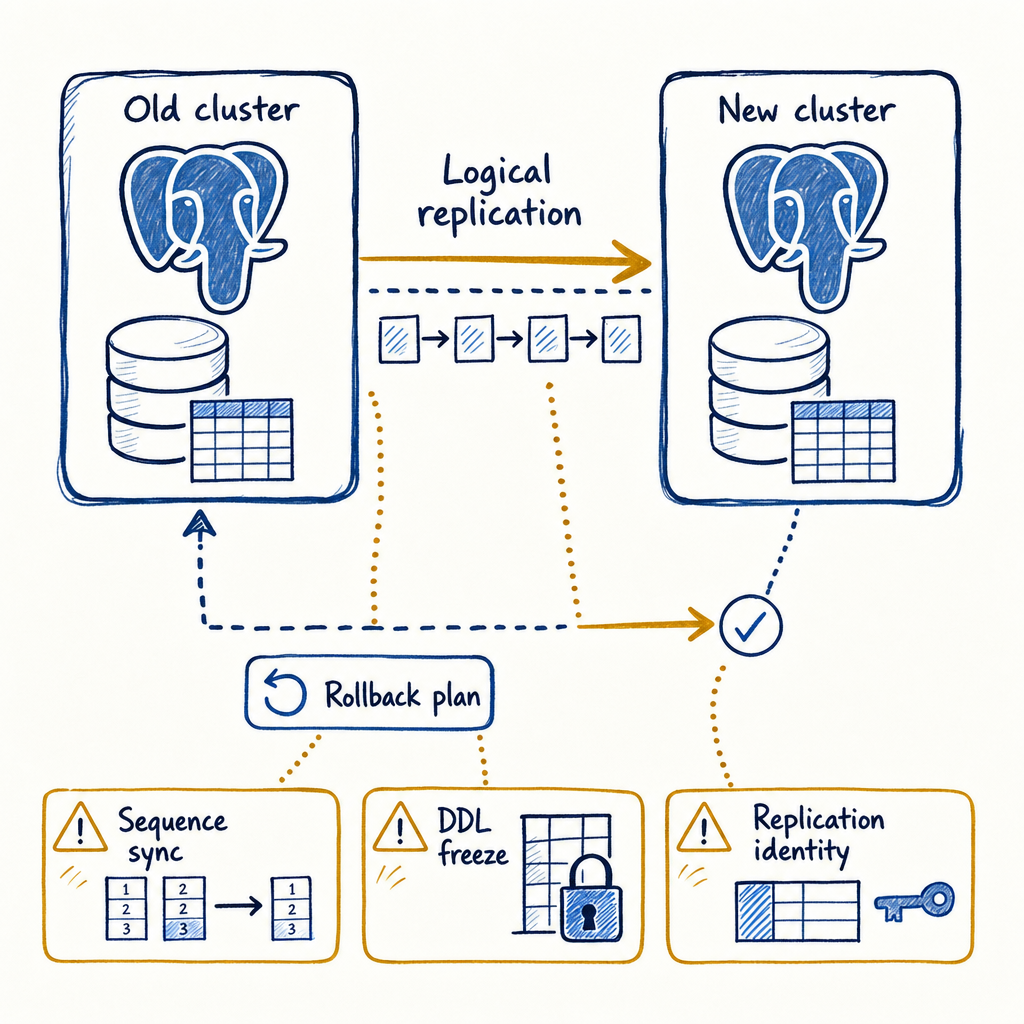
The standard approach to major version upgrades in Postgres is pg_upgrade. It’s fast, often finishing in minutes for multi-terabyte clusters. But it requires stopping both clusters cold. Once you start, your databases are offline, and the clock is ticking. If something goes wrong — a problem with an extension, a catalog inconsistency, a planner change that breaks a critical query — your only rollback is to restore from a backup taken before the upgrade. That’s not a real rollback; that’s a disaster recovery exercise. For many production systems, that’s unacceptable.
Logical replication changes the equation. You stand up a new cluster running the target version, replicate live data from the old cluster, validate everything, and then cut over with a brief write freeze instead of full downtime. The old cluster stays online the whole time, so you can always fall back to it up until the moment you decide the new cluster is good. No backup lottery. But the pattern only holds up if you handle a few sharp edges correctly: sequence values, REPLICA IDENTITY, DDL freezes, and the fact that rollback after cutover isn’t automatic.
The Five-Phase Pattern at a Glance
Before we get into the commands, here’s the full map. You’ll want this in your runbook as a mental model.
| Phase | Actions | Key Risks | |-------|---------|-----------| | 1. Stand up target cluster | Install new version, restore schema only (pg_dump --schema-only), match extensions, collations, and check for removed features. | Schema mismatches, missing extensions, collation version issues. | | 2. Set up logical replication | Set wal_level = logical on source (requires restart), create publication, restore initial data via subscription, handle REPLICA IDENTITY for tables without PKs. | Tables without PKs silently skip UPDATE/DELETE; DDL not replicated. | | 3. Monitor lag and validate | Track replication lag with pg_stat_replication/pg_stat_subscription, compare row counts/checksums, run production-shaped queries on target. | Lag spikes, data drift, query regressions. | | 4. Cutover | Freeze DDL, drain lag to zero, sync sequence values, flip connection strings. | Stale sequences cause duplicate keys; schema drift during freeze. | | 5. Keep old cluster warm | Keep old cluster accepting writes temporarily, define rollback window, decommission after validation. | Post-cutover rollback requires manual write-back or bidirectional replication. |
This is not a linear, set-and-forget process. Phase 3 can run for days or weeks, and you may loop back to Phase 2 if you discover a table missing a primary key. But the structure holds. Let’s step through each phase with the real commands you’ll actually type.
Phase 1: Standing Up the Target Cluster
You’re installing a new major version alongside the old one. The target cluster will be empty except for the schema.
Install the target version (e.g., Postgres 16) on the same host or a separate machine, depending on your resource constraints. I prefer a separate machine for serious workloads — you don’t want the COPY overhead of the initial synchronization to starve your production I/O.
Once the binaries are in place, initialize a new cluster with initdb and start it on a non-default port. Then, pull the schema from the source:
pg_dump -h old_host -p 5432 -U postgres -d mydb \
  --schema-only --no-owner --no-privileges \
  -f mydb_schema.sql
Restore that into the target:
psql -h new_host -p 5433 -U postgres -d mydb -f mydb_schema.sqlNow, match extensions carefully. Check the source:
SELECT extname, extversion FROM pg_extension;Install the same extensions on the target, but be aware that extension versions often differ between major versions. PostGIS, for example, may require a different binary package. Test that functions are callable. Collation versions can also shift; if you use non-C collations, verify with \dO and consider using ALTER COLLATION ... REFRESH VERSION. Also, inspect the release notes for the target version for any removed features or changed defaults (e.g., default_table_access_method in 14+, changes to password_encryption). You don’t want your application hitting a “function does not exist” error after cutover.
Phase 2: Setting Up Logical Replication (The Gotchas)
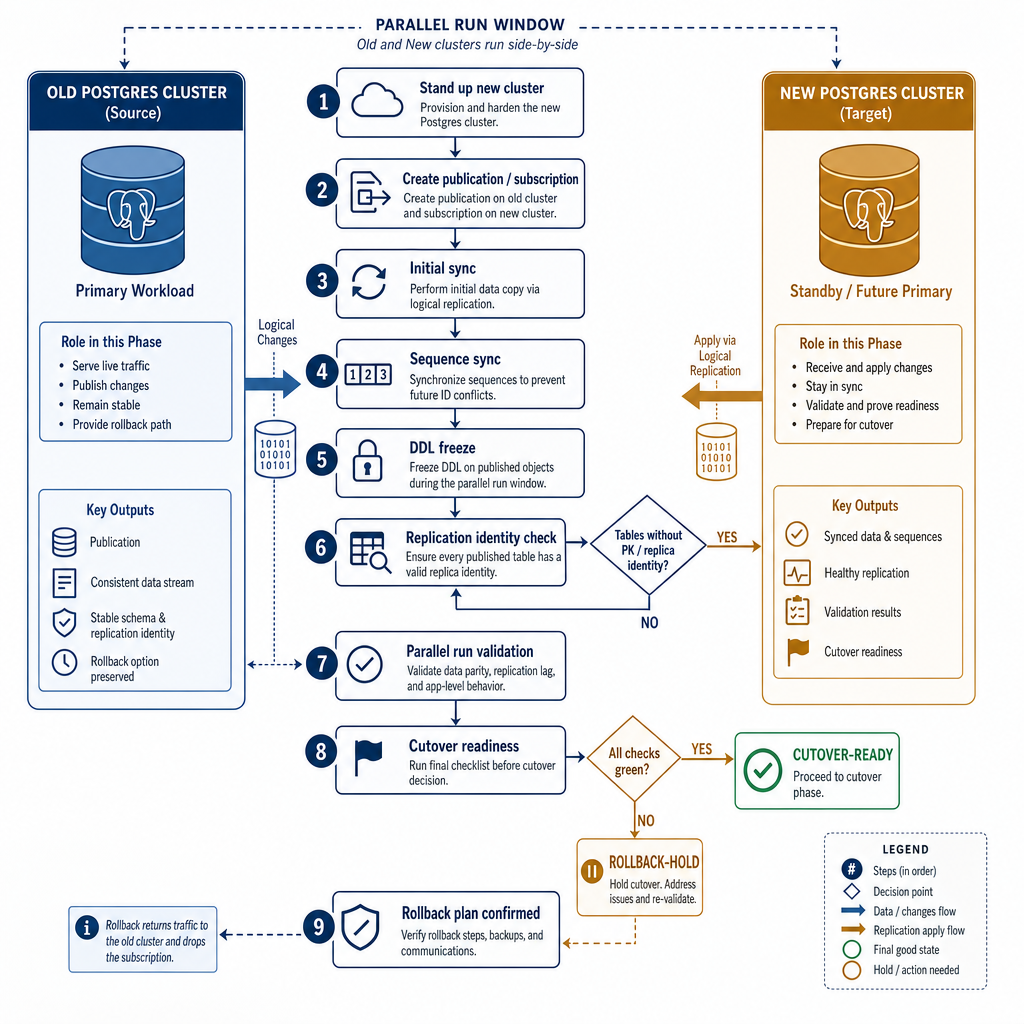
Logical replication is not a dump-and-restore. It’s a continuous, row-by-row change stream. The source must have wal_level = logical. This requires a restart:
ALTER SYSTEM SET wal_level = logical;
-- Then restart the source cluster: pg_ctl restart
If you’re in a managed service, check that logical replication is supported and that the setting can be changed. On the source, create a publication. The simplest form:
CREATE PUBLICATION upgrade_pub FOR ALL TABLES;But I rarely use FOR ALL TABLES. It’s too broad. I prefer an explicit table list, because you may have staging tables, unlogged tables, or partition parents that you don’t want to include. You can generate the list:
SELECT string_agg(quote_ident(schemaname) || '.' || quote_ident(tablename), ', ')
FROM pg_tables
WHERE schemaname NOT IN ('pg_catalog', 'information_schema');
Then create the publication with that list. Or, if you have many tables, use FOR ALL TABLES and later drop the ones you don’t need; it’s a trade-off.
Now the critical part: replica identity. Logical replication needs to uniquely identify each row to replicate UPDATEs and DELETEs. If a table has a primary key, that’s used automatically. If it doesn’t, you must set REPLICA IDENTITY FULL (which uses the whole row as the key) or a unique index. Without a replica identity, UPDATEs and DELETEs on that table will be silently skipped. That’s a data corruption risk you won’t notice until you compare counts.
Run this on the source to find tables without a primary key or a replica identity set:
SELECT quote_ident(nspname) || '.' || quote_ident(relname) AS table
FROM pg_class c
JOIN pg_namespace n ON n.oid = c.relnamespace
WHERE relkind = 'r'
  AND relreplident = 'd'  -- default, meaning no PK or explicit identity
  AND NOT EXISTS (SELECT 1 FROM pg_constraint WHERE conrelid = c.oid AND contype = 'p');
For each table, either add a primary key (best) or set REPLICA IDENTITY FULL:
ALTER TABLE no_pk_table REPLICA IDENTITY FULL;Be aware: REPLICA IDENTITY FULL can cause increased WAL volume and replication lag, because the entire old row is written to WAL for UPDATE/DELETE. Test on a large table.
On the target cluster, create the subscription. The subscription will automatically copy the initial data via a COPY process, then start streaming:
CREATE SUBSCRIPTION upgrade_sub
CONNECTION 'host=old_host port=5432 dbname=mydb user=repl_user password=secret'
PUBLICATION upgrade_pub;
The initial copy can take hours for large datasets. Monitor its progress with:
SELECT relid::regclass, srrelid::regclass, srsubstate, srrelstate
FROM pg_subscription_rel;
One more thing: DDL is not replicated. You must pre-create the schema on the target, and any subsequent schema changes (like ALTER TABLE ... ADD COLUMN) must be applied to both clusters manually. That’s why Phase 4 includes a DDL freeze.
Phase 3: Monitoring Lag and Validating Data
While replication is streaming, you need to know exactly how far behind the target is. On the source, query pg_stat_replication:
SELECT application_name, state, sync_state,
       pg_wal_lsn_diff(sent_lsn, write_lsn) AS write_lag_bytes,
       pg_wal_lsn_diff(sent_lsn, flush_lsn) AS flush_lag_bytes,
       pg_wal_lsn_diff(sent_lsn, replay_lsn) AS replay_lag_bytes
FROM pg_stat_replication;
On the target, you can check the subscription lag with pg_stat_subscription:
SELECT subname,
       pg_wal_lsn_diff(received_lsn, latest_end_lsn) AS received_lag_bytes,
       latest_end_time - last_msg_send_time AS time_lag
FROM pg_stat_subscription;
I aim for replay lag under 10 MB and time lag under 5 seconds before cutover. If you see spikes, investigate long-running transactions on the source or high write load on tables with REPLICA IDENTITY FULL. It’s also critical to remember that replication slots prevent the source from cleaning up dead tuples that are still needed by the subscriber. If replication falls severely behind, the source’s disk can fill up with unvacuumed WAL. Monitor pg_replication_slots to ensure spill_txns isn’t growing unbounded.
Data validation is tedious but necessary. I run table-level row counts and a checksum-like comparison using pg_comparator or a homegrown script that does a hash aggregate per table. For smaller tables, a simple COUNT(*) on both sides after a few minutes of idle replication is enough. For large tables, I use a checksum function that respects sort order, like:
SELECT MD5(string_agg(row_hash, '' ORDER BY id))
FROM (
  SELECT id, MD5(textin(record_out(t))) AS row_hash
  FROM my_table t
) sub;
Run this on both clusters and compare. Also, run a set of representative production queries against the target — explain plans may differ, or a planner change in the new version might produce a bad plan. You can use auto_explain to catch regressions before cutover.
Phase 4: The Cutover — DDL Freeze, Sequence Sync, Connection Flip
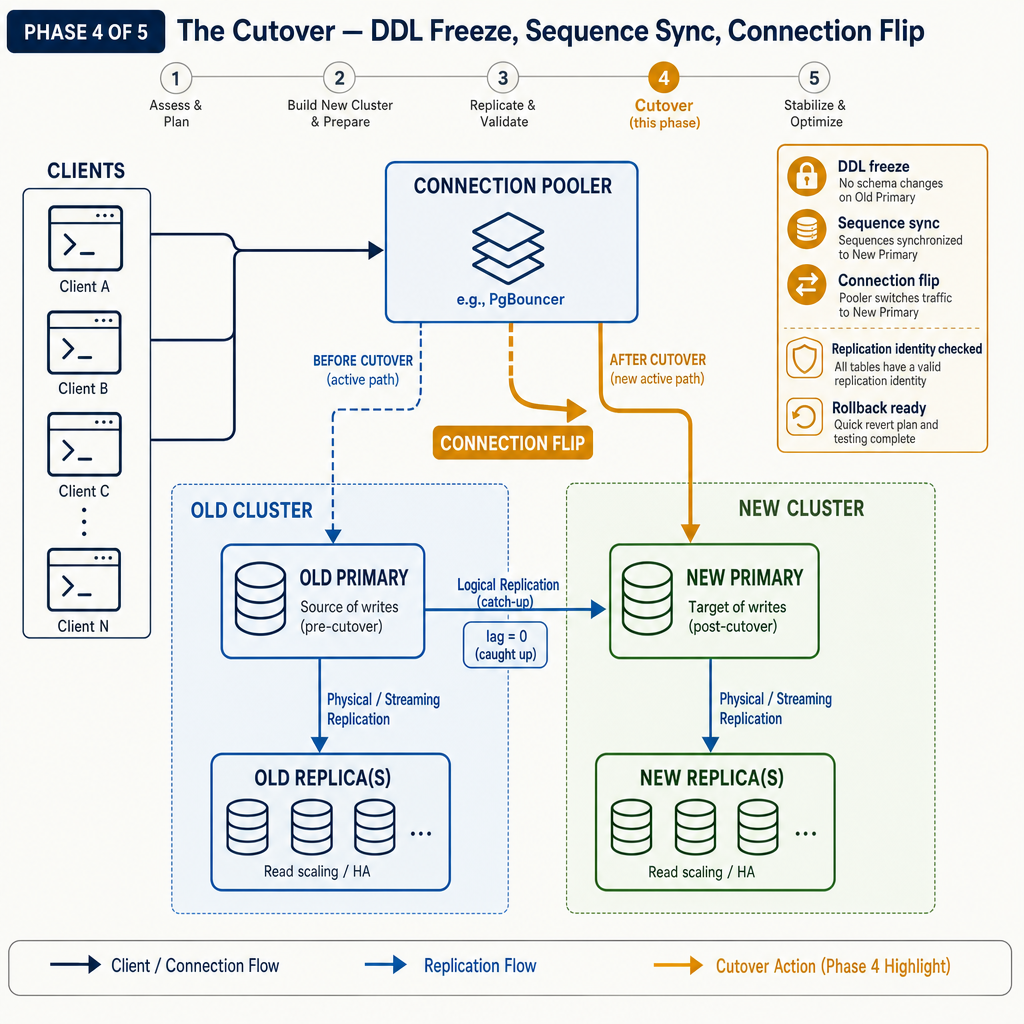
This is where the zero-downtime claim earns its keep. The cutover itself has a precise order of operations, and if you skip a step, you’ll have a bad day.
1. Freeze DDL
Before you start cutting off writes, you must stop all schema changes on the source. Since DDL doesn’t replicate, any ALTER TABLE run on the source after the freeze will create a schema mismatch on the target. I usually announce a 30-minute DDL moratorium. The good news: you can still make schema changes during the freeze window, as long as you apply them to both clusters. But it’s safer to just stop.
2. Drain Replication Lag to Zero
Watch the lag queries from Phase 3. You want flush and replay lag to be effectively zero for at least a minute. If you can’t get it to zero, you have a problem — perhaps a long-running transaction on the source holding up WAL cleanup, or a slow network. Troubleshoot it before proceeding.
3. Sync Sequence Values
This is the most common gotcha. Logical replication does not replicate sequence state. If you’ve been using SERIAL or BIGSERIAL columns, the sequence on the target will be stuck at the value it had when the initial copy finished. Any nextval() calls made on the source after that point are invisible. After cutover, the target will happily hand out stale sequence numbers, leading to duplicate key violations.
The fix: just before you cut off writes, snapshot the current value of every sequence on the source, and set those values on the target. Here’s a script that does it safely:
-- On the source, generate ALTER commands for the target
SELECT 'ALTER SEQUENCE ' || quote_ident(schemaname) || '.' || quote_ident(sequencename) ||
       ' RESTART WITH ' || (last_value + 1) || ';'
FROM pg_sequences
WHERE last_value IS NOT NULL;
Run that on the source, capture the output, and then execute those statements on the target. This sets the sequence to the next value it would hand out. For extra safety, I add a small buffer (e.g., + 1000) to account for any writes that might slip through during the cutover; you can always reset it later. But even a buffer of 1 is better than none.
Important: If you have identity columns (GENERATED AS IDENTITY), they use internal sequences, but you can still adjust them with ALTER TABLE ... ALTER COLUMN ... RESTART WITH. Check pg_sequences for identity sequences as well.
4. Final Verification and Connection Flip
After the sequence sync, run your row count checksums one last time, or at least verify that the number of rows in critical tables matches. Then, the actual cutover:
- Stop writes to the old cluster. This can be done by revoking INSERT/UPDATE/DELETE privileges, setting the database to read-only with
ALTER DATABASE mydb SET default_transaction_read_only = on;, or by pausing the application. - Wait for the final bits of replication to catch up (lag should be zero).
- Flip the application connection strings to point to the new cluster. If you use a connection pooler or DNS, update the CNAME or pooler configuration.
- Validate that the new cluster is accepting writes and serving traffic correctly.
You’ve now cut over to the new cluster. But the post‑cutover moments are where you’re most exposed — not because the database is fragile, but because your validation radar is still warming up. For the first few minutes, watch the logs for constraint violations, bad query plans, or authentication failures from stale connection parameters. I keep a tail on the new cluster’s error log and run a canned smoke test that inserts a known row into a canary table, updates it, and then verifies it on a read replica (if you have one). If anything smells wrong, you can still roll back.
5. Rollback (Briefly) Possible
Because the old cluster never went offline and you only paused writes, rolling back is a matter of pointing the connection string back and reviving the application. There’s a catch: any writes that reached the new cluster after the flip are invisible to the old cluster unless you’ve set up bidirectional replication. For most upgrades I do not; the added complexity of conflict resolution isn’t worth it for a one‑time cutover. Instead, I define a hard rollback window — usually 15 minutes — during which we’ll accept the small data loss risk if we have to revert. After that window, we consider the old cluster read‑only and begin decommissioning. If you absolutely need zero data loss rollback, you’re looking at a much heavier pattern involving bi‑directional filtering and logical origin tracking, and that’s a whole separate article.
Phase 5: Keeping the Old Cluster Warm and Final Decommissioning
Even after the cutover, don’t touch the old cluster beyond revoking write access. Leave it running in read‑only mode for at least a business cycle — a full day of traffic, or a week if your usage patterns have weekend‑only workloads that might expose a hidden regression. The warm old cluster is your last‑resort safety net: you can still query it to compare data, retrieve the state of sequences before the upgrade, or even dump and re‑import a single table if you discover a logical replication miss.
When you’re truly ready to decommission, the sequence is:
- Disable the subscription on the new cluster to free the replication slot on the old one:
ALTER SUBSCRIPTION upgrade_sub DISABLE;thenDROP SUBSCRIPTION upgrade_sub;. - Drop the publication on the old cluster:
DROP PUBLICATION upgrade_pub;. - Reset the
wal_levelon the old cluster back toreplicaif you want, though at this point the cluster will likely be shut down forever. - Archive the old data directory and take a final base backup before retiring the machine.
When the Dust Settles
A major version upgrade done this way feels less like a high‑wire act and more like swapping out an engine while the ship is still moving. The key was never the logical replication itself — that’s just plumbing. The real work is in the discipline: verifying replica identities, syncing sequences at exactly the right moment, and accepting that DDL freezes are mandatory even when someone is yelling about an urgent column addition.
I’ve run this pattern on clusters from a few hundred gigabytes to tens of terabytes. The biggest time sink is always phase 3 — validation. You can’t rush it because the things that break after an upgrade are rarely the things you tested. A query plan that flips on an indexed view, an extension that silently adopts a new default cost model, a collation change that re-orders ORDER BY — those will only surface under real production load. That’s why I keep the old cluster around for far longer than the cutover takes; it’s the cheapest insurance you can buy.
If you’re managing upgrades across many environments, the manual steps become a liability. Sequencing the DDL freeze, the lag drain, and the sequence sync across dozens of databases is not something you want to do by hand at 2 a.m. At MyDBA we’ve built orchestration layers that wrap exactly this pattern, handling the publication lifecycle, cross‑checking replica identities, and automating the cutover checklist so you don’t miss a beat. Whether you use a tool or keep it manual, the pattern itself is sound — but only if you treat it like a process, not a script.